Thursday, July 30, 2015

How to use Script Mediator in WSO2 ESB

WSO2 ESB provides the flexibility to use function of scripting language like JavaScript, Ruby or groovy.

This script mediator can be used in a separate file located in local registry or also can be written in embedded inline synapse configuration.

To support scripting language, synapse uses Bean Scripting Framework. To use scripting mediator we have to use a pre-defined mc variable. The mc variable represents an implementation of the MessageContext, named ScriptMessageContext.java, which contains the following methods that can be accessed within the script as mc.methodName.

These are the list of Method names and its description to be used in script mediator.


Return Type
Method Name
Description
Yes
getPayloadXML()
This gets an XML representation of SOAP Body payload.
No
setPayloadXML(payload)
This sets the SOAP body payload from XML.
No
addHeader(mustUnderstand, content)
This adds a new SOAP header to the message.
Yes
getEnvelopeXML()
This gets the XML representation of the complete SOAP envelope.
No
setTo(reference)
This is used to set the value which specifies the receiver of the message.
Yes
setFaultTo(reference)
This is used to set the value which specifies the receiver of the faults relating to the message.
No
setFrom(reference)
This is used to set the value which specifies the sender of the message.
No
setReplyTo(reference)
This is used to set the value which specifies the receiver of the replies to the message.
Yes
getPayloadJSON()
This gets the JSON representation of a SOAP Body payload.
No
setPayloadJSON(payload)
This sets the JSON representation of a payload obtained via the getPayloadJSON() method and sets it in the current message context.
Yes
getProperty(name)
This gets a property from the current message context.
No
setProperty(key, value)
This is used to set a property in the current message context. The previously set property values are replaced by this method.

Syntax:

To define the script mediator in synapse file you have put a single line in which you have to provide java script file and its key name. in below example we are calling a java script file which has the function to get employee details.

<localEntry key="EmpDetailsScript" src="file:repository/conf/emp/resources/scripts/EmpDetailsTransform.js"/>

Call Function from synapse:

To call the function we have write below code, in which we have to supply its key name and the function name which is to be called. In below code we are calling a function “getITEmployee” which will get get all IT employee details.

<script language="js" key="CallITEmployee" function=" getITEmployee"/>

Function in Java script:

We are using a payload method in which we are calling another request which will fetch the Employee details of a particular department.
  
function getITEmployee(mc) {
      var Department = mc.getProperty("Department");
mc.setPayloadXML(
      <emp:getEmployeeDetailRequest xmlns:emp="http://shriwithjava.blogspot.com/services/empdetails">
         <emp:Department>{Department}</emp:Department>
      </emp:getEmployeeDetailRequest>
        );
}


UI Configurations:

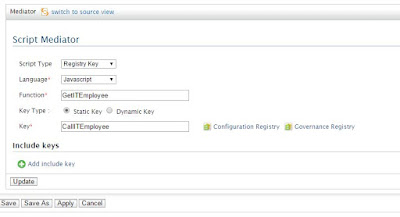
Below is the step to call script mediator from console UI. When you click on ‘script’ then below screen will appear.


In below screen you have to pass Script Type, Language Its function name and key of this java script.


Click on apply to use this mediator. Once you click on the save it will be added in service.


To see this is in coding format then click on the “Switch to design view”.
You can use normal other java script function as well to make your logic as required.

Tuesday, July 28, 2015

How to use Filter Mediator in WSO2 ESB

Filter mediator is basically used to match or filter the message for a given xpath.

If user gives only the xpath then it will return true or false but if user gives regular expression then the string returned from evaluating the XPath will be matched against the regular expression.

Syntax:

<filter (source="xpath" regex="string") | xpath="xpath">
   mediator+
</filter>

This is same as Java coding like "if else" condition. If string in filter is matched then execute “then” block otherwise execute “else” block (if else block is also written) .

Example:

<filter xpath="get-property('Language')='WSO2'">
      <then>
            <send>
                  <endpoint key="GetWSO2DetailsService_EPR"/>
            </send>
      </then>
      <else>
            <send>
                  <endpoint key="GetJAVADetailsService_EPR"/>
            </send>
      </else>
</filter>


In above example we are checking the value of ‘Language’, if the value of ‘Language’ is WSO2 then it will call a GetWSO2DetailsService service in send mediator otherwise it will call a GetJAVADetailsService service.

Here “get-property” is a property mediator which holds a particular value same as in Java a variable holds a value.

Monday, July 27, 2015

How to create Data Source in WSO2 DSS

In this blog we will see hot to create a data source in DSS and will use the same in one data service.

Data source is just a database connection to fetch the data from the database, but we keep it in a common place and keep using this from data service so that if in future if any change is required then no need to go again and again in each data service and change it but good option to change in one place and it will reflect in all the data service whichever is using this data source. This gives the flexibility to service to enable data stored in several of data storage, Here we will only talk about RDBMS data source.

RDBMS data sources are used to service enable data from a relational database.


Steps to create Data Source:


Click on configuration on left panel above sheen will come.


Click on Data Sources icon to create new Data Source.


Fill the details as required, here we are creating data source for MySql database.


Once you fill all the necessary information then check the connection by clicking “Test Connection” if everything is configured properly a screen will popup saying “Connection is healthy”.


This is the last step just click on the save button to create this data source. It will be added in above screen.

Example:

 <data name="EmployeeDataService" enableBatchRequests="false" enableBoxcarring="false" serviceStatus="active">    
   <config id="mySqlDataSource">     
   <property name="carbon_datasource_name">mySqlDataSource</property>  
   </config>    
   <query id="DataQueryEmp" useConfig="mySqlDataSource">     
    <sql>select EMP_ID, EMP_NAME, EMP_ADDRESS from emp_table where EMP_ID=?</sql>     
    <result element="employees" rowName="employee" defaultNamespace="http://shriwithjava.blogspot.co.nz/">       
      <element name="id" column="EMP_ID" xsdType="xs:string" />       
      <element name="name" column="EMP_NAME" xsdType="xs:string" />       
      <element name="address" column="EMP_ADDRESS" xsdType="xs:string" />     
    </result>    
       <param name="empId" paramType="SCALAR" sqlType="STRING" type="IN" />    
   </query>    
   <operation name="getEmployees">     
    <description></description>     
    <call-query href="DataQueryEmp" >  
 <with-param name="empId" query-param="EmpId" />   
 </call-query>      
   </operation>  
 </data>  

Tuesday, July 21, 2015

How to apply Caching in WSO2 DSS

There is very easy way to apply caching in WSO2 DSS using console UI. Whenever we create a data service which interacts with the database and if we realize that database is not being change very frequently then Caching can be used. We have to set caching time in this UI configuration by which request will not go to database each time (within the caching time), this way we can optimize our solution and reduce the response time of the service as well.

In this blog we will set a caching in a data service which has been created with Mysql database which fetches the employee data from the database. If you have to see that how this service is created then go to my first DSS Blog.


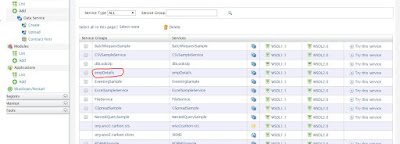
Here is the list of different service but we have to put caching only in empDetail data service. To apply caching click on this service, it will open below page.


Again click on this empDetail service, it will redirect to you below page.


In this page there are different option but you have to choose Response Caching option, once you click this you will be rediredted to below page.


There is a drop down button in which you have to choose ‘Yes’ to enable cache. After selecting YES, it will go to below page.


In this page basically, you have to put caching time and maximum caching size on number and other details as well. You can set this time to 1 hour, 1 day as required.

Click on finish button to enable caching.


One caching is enabled above page will pop up with successful message.
If you restart the server then the first hit will go to the database and first hit’s data will be cached and DSS will be reusing this data until caching time gets expired then again it follow the same process.

Make sure whenever you apply caching, restart your DSS server for the best practice.


Monday, July 20, 2015

How to use Payload Factory in WSO2 ESB

Payload factory mediator is used to transform the message in desired output. It replaces the message of your content; it can be a request, response of any normal content. In the payload we can pass some argument to make it dynamic otherwise in payload we can pass static content as well.

Syntax:
<payloadFactory media-type="xml | json">
    <format ../>
    <args>      
        <arg (value="string" | expression=" {xpath} | {json} ")/>*
    </args>
</payloadFactory>

In above syntax payload factory is defined, which start with keyword ‘payloadFactory’. Inside of payload factory we have to pass format in which we can put any request, response, any structure of xml or any content. If format is dynamic then we have to pass argument to fill its data by <args> tag.

In above format media type can be either json or xml but by default media-type is xml. Ongoing message in payload factory can be changed by the below property.

<property name="messageType" value="application/json" scope="axis2"/>

Here outcome message is being changed in json format.


Example:

<payloadFactory media-type="xml">
        <format>
                <emp:getEmployeeDetails xmlns:deal="http://twodegreesmobile.co.nz/employeedetails">
                        <emp:employeeName>$1</emp:employeeName>
                        <emp:employeePassword>$2</emp:employeePassword>        
                </emp:getEmployeeDetails>
        </format>
        <args>
                <arg expression="get-property('EmpName')"/>
                <arg expression="get-property('EmpPassword')"/>
        </args>
</payloadFactory>
<send>
        <endpoint key="DSS_EmployeeDetailsProxy_EPR"/>
</send>


In above example we are calling an external service as a part of service chaining using payload factory. This service will get employee details from the DSS_EmployeeDetailsProxy service which is a DSS service that is why prefix DSS is used.

In this example we are passing two arguments and if you look into the format tag, argument is getting filled by the $n values. In argument there are 2 values EmpName and EmpPassword and same in the request, we have two placeholder for that with value of $1 and $2, which will be replaced by the argument value.


Tuesday, July 7, 2015

How to use Enrich Mediator in WSO2 ESB

Enrich mediator is used when a particular message needs to be send to customer with some modification as required. It basically process message from the source configuration to target configuration. It takes the OMElement from the source configuration and modifies the message by putting it on the main message by the target configuration.

Syntax
<enrich>
    <source [clone=true|false] [type=custom|envelope|body|property|inline] xpath="" property="" />
    <target [action=replace|child|sibiling] [type=custom|envelope|body|property|inline] xpath="" property="" />
</enrich>

Here whatever message or property needs to be updated that is put in source tag and where this message needs to be updated put the value in the target tag.

UI Configuration:


Source Configuration:
  • Clone: to make the message clone this property is used, default value is false.
  • Type: This is basically used that how and what message is being modified from the original message. It could be property, custom, body inline etc. in our example we are using property type.

Target Configuration:

It is the property where you need to modify the required message.
  • Action: Any action which we want to be executed for target message we can provide it can be replace, child or sibling. For example replace will replace the XML message based on the target type specified on the target configuration. .
  • Xpath: This is provided when a xml parameter needs to be replaced with this we need to pass the namespace as well to replace the source value in this target xml tag.

Example:

<proxy name="EnrichExampleProxy" transports="https http" startOnLoad="true" trace="disable" statistics="enable">
        <target inSequence="EnrichExampleProxy_IN" outSequence="EnrichExampleProxy_OUT" faultSequence="Enrich_Fault_Handler"/>
        <publishWSDL key="EnrichExampleProxy_wsdl"/>
    </proxy>
  <localEntry key="EnrichExampleProxy_wsdl" src="file:repository/conf/enrich/resources/proxy/EnrichExample.wsdl"/>
            <sequence name="EnrichExampleProxy_IN">
    <log level="full"/>
                                    <property name="blogName" action="set" value="Java is Easy"/>
            <enrich>
                        <source type="property" clone="true" property="blogName"/>
                        <target xpath="//blogName"  xmlns:jis="http://shriwithjava.blogspot.co.nz/enrich/" />
            </enrich>
            <log level="full"/>
        <send>
            <endpoint key="EnrichExampleProxy_EPR"/>
        </send>
    </sequence>
    <sequence name="EnrichExampleProxy_OUT">
        <log level="full"/>
        <send/>
    </sequence>
     <sequence name="Enrich_Fault_Handler">
        <log level="custom">
            <property name="MESSAGE" value="Executing default &quot;fault&quot; sequence"/>
            <property name="ERROR_CODE" expression="get-property('ERROR_CODE')"/>
            <property name="ERROR_MESSAGE" expression="get-property('ERROR_MESSAGE')"/>
        </log>
        <send/>
    </sequence>         


   In the above example we have created a proxy which as In Sequence and out sequence and trying ‘blogName’ property as a ‘Java Is Easy’. In enrich mediator we have used property as a source and trying to set it in ‘blogName’ parameter in service and for the same we have provided the namespace as ‘xmlns:jis="http://shriwithjava.blogspot.co.nz/enrich/”’, so before sending this request to the client it will send the Java is easy value in blogName tag.
This mediator can be used to set any value in request xml before sending it to client because in the some cases you don’t get the proper request but as per the client requirement we can update the request and its value before sending it.