Wednesday, August 14, 2013

How To Use Sort Method Of Collections In Java


Collections contains the sort(List<T>) method, which is used to sort the specified list into ascending order, according to the natural ordering of its element.

Declaration :

declaration of method - java.util.Collections.sort() method.

public static <T extends Comparable<? super T>> void sort(List<T> list) 
     
Parameters :

list - Ihis is the list to be sorted.

Example :

******************************************************************************

package org.javaIsEasy.collectionPrograms;

import java.util.ArrayList;
import java.util.Collections;
import java.util.Iterator;

public class SortListExample {
 public static void main(String[] args) {
  ArrayList<String> programmingLanguageList=new ArrayList<String>();
  programmingLanguageList.add("PHP");
  programmingLanguageList.add(".NET");
  programmingLanguageList.add("C++");
  programmingLanguageList.add("JAVA");
  programmingLanguageList.add("PERL");
 
  System.out.println("Display List Before Sorting\n");
  Iterator<String> it=programmingLanguageList.iterator();
  while(it.hasNext())
  {
   System.out.println(it.next());
  }
  Collections.sort(programmingLanguageList);
 
  System.out.println("Display List After Sorting\n");
  Iterator<String> itSwapped=programmingLanguageList.iterator();
  while(itSwapped.hasNext())
  {
   System.out.println(itSwapped.next());
  }
 }
}

******************************************************************************

OUTPUT :

******************************************************************************
Display List Before Sorting

PHP
.NET
C++
JAVA
PERL
Display List After Sorting

.NET
C++
JAVA
PERL
PHP

******************************************************************************


How To Find Number Of Occurrence Of An Object In List


The frequency(Collection<?>, Object) method is used to get the number of occurrence of an elements in the specified collection.

Declaration
declaration of method -  java.util.Collections.frequency().

public static int frequency(Collection<?> c, Object o)

Parameters

Collection<?> c  -  Pass the object of collection in which to determine the frequency of o.

Object o  -  Pass the object whose frequency is to be determined.


Example :

*********************************************************************************
package org.javaIsEasy.collectionPrograms;

import java.util.ArrayList;
import java.util.Collections;
import java.util.Iterator;

public class FrequencyExample {
 public static void main(String[] args) {
  ArrayList<String> programmingLanguageList = new ArrayList<String>();
  programmingLanguageList.add("PHP");
  programmingLanguageList.add(".NET");
  programmingLanguageList.add("PERL");
  programmingLanguageList.add("JAVA");
  programmingLanguageList.add("PERL");
  programmingLanguageList.add("PYTHON");
  programmingLanguageList.add("PERL");

  System.out.println("Display List Of Programming Language\n");
 
  Iterator<String> it = programmingLanguageList.iterator();
 
  while (it.hasNext()) {
   System.out.println(it.next());
  }
 
  int occurrences_Of_PERL = Collections.frequency(programmingLanguageList, "PERL");

  System.out.println("Display occurrences of 'PERL'---->"+ occurrences_Of_PERL);
 }
}

*********************************************************************************


OUTPUT :

*********************************************************************************
Display List Of Programming Language

PHP
.NET
PERL
JAVA
PERL
PYTHON
PERL
Display occurrences of 'PERL'---->3

*********************************************************************************


How To Use Swapping Method Of Collections In Java


Collections has swap(List<?>, int, int)  method, which is used to swap the elements at the specified position in the specify list.


Declaration of the Method:

This is the declaration of the method  -  java.util.Collections.swap()


public static void swap(List<?> list,int i,int j)


Parameters:

List - Pass the object of the list in which swapping method is to be performed.
int i - Pass the index of the one element which is to be swapped.
int j - Pass the index of the one element which is to be swapped with given int i index.


Example :


*******************************************************************************

package org.javaIsEasy.collectionPrograms;

import java.util.ArrayList;
import java.util.Collections;
import java.util.Iterator;

public class SwapListExample {

 public static void main(String[] args) {
  ArrayList<String> programmingLanguageList=new ArrayList<String>();
  programmingLanguageList.add("PHP");
  programmingLanguageList.add(".NET");
  programmingLanguageList.add("C++");
  programmingLanguageList.add("JAVA");
  programmingLanguageList.add("PERL");

  System.out.println("Display List Before Swapping\n");
  Iterator<String> it=programmingLanguageList.iterator();
  while(it.hasNext())
  {
   System.out.println(it.next());
  }
  Collections.swap(programmingLanguageList, 0, 3);

  System.out.println("Display List After Swapping\n");
  Iterator<String> itSwapped=programmingLanguageList.iterator();
  while(itSwapped.hasNext())
  {
   System.out.println(itSwapped.next());
  }
 }
}


*******************************************************************************

Output :


*******************************************************************************
Display List Before Swapping

PHP
.NET
C++
JAVA
PERL
Display List After Swapping

JAVA
.NET
C++
PHP
PERL

*******************************************************************************

How to Read Excel File in Java using "Apache Poi" API.


Apache POI is a powerful Java library to work with different Microsoft Office file formats such as Excel, Power point, Visio, MS Word etc.

Let's create a Excel file and insert some data into this file and give this file name as "JavaIsEasy.xls".


Now we need to add library files to execute this program, as follows.


  • poi-3.7-beta1
  • poi-3.8-beta4-20110826
  • poi-ooxml-3.5-beta5


Add above jar in eclipse.


Now create a java class named as "ReadExcelFile.java".


*******************************************************************************


import java.io.FileInputStream;
import java.io.IOException;
import java.io.InputStream;
import java.util.Iterator;

import org.apache.poi.hssf.usermodel.HSSFWorkbook;
import org.apache.poi.poifs.filesystem.POIFSFileSystem;
import org.apache.poi.ss.usermodel.Cell;
import org.apache.poi.ss.usermodel.DateUtil;
import org.apache.poi.ss.usermodel.Row;
import org.apache.poi.ss.usermodel.Sheet;
import org.apache.poi.ss.usermodel.Workbook;
import org.apache.poi.xssf.usermodel.XSSFWorkbook;

public class ReadExcelFile {
 
  public static void main(String[] args) throws IOException {
      String fname = "C:/DATA/Software/LIFERAY/liferay data/Blogs Material/Core Java/JavaIsEasy.xls"; 
     //********************************************************************
      
      
      InputStream inp = new FileInputStream(fname);
      String fileExtn = GetFileExtension(fname);
      Workbook wb_xssf; 
      Workbook wb_hssf; 
      Sheet sheet = null; // sheet can be used as common for XSSF and HSSFWorkBook
      if (fileExtn.equalsIgnoreCase("xlsx"))
      {
        wb_xssf = new XSSFWorkbook(fname);
       log("xlsx="+wb_xssf.getSheetName(0));
       sheet = wb_xssf.getSheetAt(0);
      }
      if (fileExtn.equalsIgnoreCase("xls"))
      {
   POIFSFileSystem fs = new POIFSFileSystem(inp);
       wb_hssf = new HSSFWorkbook(fs);
       log("xls="+wb_hssf.getSheetName(0));
       sheet = wb_hssf.getSheetAt(0);
      }
      Iterator rows = sheet.rowIterator(); // Now we have rows ready fromthe sheet
      
   while (rows.hasNext()) 
       { 
           Row row = (Row) rows.next();
           log("row#="+row.getRowNum()+"");
           log("**********************");
    //log(row.getPhysicalNumberOfCells()+"");
    Iterator cells = row.cellIterator();
    String cellValue=null;
    while (cells.hasNext())
    {
        Cell cell = (Cell) cells.next();
     
     switch ( cell.getCellType() ) 
     {
     case Cell.CELL_TYPE_STRING:
         log(cell.getRichStringCellValue().getString());
         cellValue=cell.getRichStringCellValue().getString();
     break;
     case Cell.CELL_TYPE_NUMERIC:
           if(DateUtil.isCellDateFormatted(cell)) {
             log(cell.getDateCellValue()+"");
             cellValue=cell.getDateCellValue().toString();
           } else {
             System.out.println(cell.getNumericCellValue());
             cellValue=String.valueOf(cell.getNumericCellValue());
           }
           break;
     case Cell.CELL_TYPE_BOOLEAN:
           log(cell.getBooleanCellValue()+"");
           cellValue=cell.getBooleanCellValue()+"";
           break;
         case Cell.CELL_TYPE_FORMULA:
           log(cell.getCellFormula());
           cellValue=cell.getCellFormula();
           break;
     default:
     }
   
    
    }
       }
   inp.close();
  } 
  
  private static void log(String message)
  {
          System.out.println(message);
  }
  private static String GetFileExtension(String fname2)
  {
      String fileName = fname2;
      String fname="";
      String ext="";
      int mid= fileName.lastIndexOf(".");
      fname=fileName.substring(0,mid);
      ext=fileName.substring(mid+1,fileName.length());
      return ext;
  }
}


*******************************************************************************

Now execute this program.

Output:-

*******************************************************************************

xls=Sheet1
row#=0
**********************
Programming Language
Projects Done
Last Used

*
*
*
row#=4
**********************
PHP
0.0
Not Used

*******************************************************************************

Liferay Overview


Portlets are web applications that are designed to run inside a portlet container that implements either the Portlet 1.0 (JSR 168) or Portlet 2.0 (JSR 286) standard. Portlet containers provide a layer of abstraction over the Java EE Servlet API, and consequently require a servlet container like Apache Tomcat to function.

        Portals are standalone systems that use a portlet container as the runtime engine for executing portlets. When a portal is asked to deliver a portal page to the end-user’s web browser, each portlet is asked to render itself as a fragment of HTML. It is the job of the portal to aggregate these HTML fragments into a complete HTML document.


Portlet life cycle -

Each portlet in jPortlet exhibits the following portlet life cycle.
  • init() -  When the Portal initializes, it initialized each Portlet by calling their init() method. Like Servlets, the only one instance of the Portlet is initianticiate and shared by all the users.

  • service() - The portal calls the service() method when the portlet is required to render it's content. During the life cycle of the portlet the service() method is typically called many times.  

  • destroy() - When the portal is terminating, portlets are taken out of service, then destroyed with the destroy() method. Finally the portlet is garbage collected and finalized.


In order to service users, each portlet is combine with a user session. When the user logs into the portal, the login() is called for each portlet, which allow each portlet to initialize the user portlet. The portlet call the logout() method of each portlet to inform the the user's session is terminating. 

Portlet modes  -

A portlet mode indicates the function a portlet is performing in the render method. Portlet modes allow to display different user interfaces, depending of the task required. In jPortlet, there are 4 diplay modes which can be invoked by icons on the portlet title bar. 
The following modes are supported by the Portlet API:

View - 

This is the portlet's normal mode of operation.


Help - 
If this mode is supported by a portlet, the portlet provides a help page for users to obtain more information about the portlet.


Edit - 
If this mode is supported by a portlet, the portlet provides a page for users to customize the portlet for their own needs. For example, a portlet can provide a page for users to specify their location for obtaining local weather and events. Users must be logged into the portal to access edit mode.  


Configure - 

If this mode is supported by a portlet, the portlet provides a page for portal administrators to configure a portlet for a user or group of users. The Portlet API provides methods for the portlet to determine the current or previous mode. All portlets must support the VIEW mode.

Portlet Window States - 

Portlet states allow to change how the portlet window is displayed within the portal. The following states are supported by the Portlet API: 

NORMAL - The is when the portlet is arranged with other portlets.

MAXIMIZED - When a portlet is maximized, it is displayed in the entire body of the portal, replacing the view of other portlets. The Portlet API provides methods for the portlet to determine the current state. By default, jPortlet always display the modes EDIT, CONFIGURE and HELP in MAXIMIZED state. 

Portlet events - jPortlet supports 2 type of events: 

Action events-

When a user click a SUBMIT button in the HTML view of the portlet, this click is transformed to an ActionEvent that is generated and received by the Portlet's ActionListener 


Message events -

These event are generated when a portlet send a message to another portlet. Its a basic structure for inter-portlet communication. MessageEvent are received by the target Portlet's MessageListener

Portlet Preferences - 

Developers often have the requirement to provide the end-user with the ability to personalize the portlet behaviour in some way. To meet this requirement, the Portlet 1.0 and 2.0 standards provide the ability to define preferences for each portlet. Preference names and default values can be defined in the WEB-INF/portlet.xml configuration file. Portal end-users start out interacting with the portlet user interface in portlet VIEW mode but can switch to portlet EDIT mode in order to select custom preference value.
Example 1.1. Specifying preference names and associated default values in the WEB-INF/portlet.xml configuration file.

<portlet-app>
        <portlet>
               ...
               <portlet-preferences>
                       <preference>
                               <name>datePattern</name>
                               <value>MM/dd/yyyy</value>
                       </preference>
                       <preference>
                               <name>unitedStatesPhoneFormat</name>
                               <value>###-###-####</value>
                       </preference>
               </portlet-preferences>
               ...
        </portlet>
</portlet-app>


What is the use of Static Import?


Static Import is a new feature added in Java 5 specification.

let's first know, why do we use "import".
If we write as mentioned below

import form.ArtworkForm;

It gives access to use class 'ArtworkForm' inside whole program without using package reference.
'form' is a name of package here.

We can create any object of this class..
ArtworkForm obj=new ArtworkForm();

If we use * after package name in import statement, then it will give you access to use all classes
and it's method or members.

import form.*;

Now let's get into details with "Static import"...

double r = Math.cos(Math.PI * theta);

In the above line, we are using Math.cos and Math.PI. somewhere it looks awkward, to make it looks good
we can use as mentioned below.

import static java.lang.Math.PI;
import static java.lang.Math.cos;

now the code would be like this...

double r = cos(PI * theta); (It seems good)

Only advantage that I see is readability of the code. Instead of writing name of static class,
one can directly write the method or member variable name.

How to create Portlet in Liferay using eclipse


Creating portlets with liferay plugin SDK is very simple. For creating a portlet we need to
have..

Here we are using below enviornment.

1) liferay-plugins-sdk-6.1.0
2) liferay-portal-6.1.1-ce-ga2
3) Juno eclipse with liferay plugins
4) Jdk 1.6_45

Let's start creating our first portlet.

Go to File → New → Liferay Project


Next, go through the following steps to setup your new portlet:

Fill in the Project and Display names with my-firstdemo-portlet and My firstdemo, respectively.
Liferay adds automatically "-portlet" at the end of the project name.


If Liferay Plugins SDK is not configured, click "configure" link and give the path of the downloaded "liferay plugin sdk".

Same if "Liferay Portal Runtime" is not configured, click "New" button and give path of the "liferay-portal-6.1.1" bundle.


Select Liferay v6.1 CE(Tomcat 7) for the server run time enviornment.


Click finish.

Now you can see the directory structure of the project. As project is created "Build Successful" message can  be seen.


Now our first default application has been created and ready to run on server. To run this project, right click on the project and select server to deploy the application.


Liferay server has already been selected and click finish button.


You can see the log on console of the eclipse.


Server is running on the "http://localhost:8080/" address.

login with the default Email Address and the password.

Email Address - test@liferay.com
Password - test


 Click on the "Add" button on the left top.


Now our portlet can be seen under "Sample tag" with the name of the "My Firstdemo". Select this and click on add next to it. This portlet will be added in the main page.


In the last image our portlet has been added.
A search portlet is already added in this page.


Congratulations!! we have successfully created and deployed our first portlet.


Static Class with an example

      To declare a Static class we need to have nested class, one single class cannot be declared static. To understand this let’s go through with the Top-level class or Outer Class and inner class.
Here we go…


Top-level classes:-
You declare a top-level class at the top level as a member of a package. Each top-level class corresponds to its own java file sporting the same name as the class name.

A top-level class is by definition already top-level, so there is no point in declaring it static; it is an error to do so. The compiler will detect and report this error.

Inner classes:-
You define an inner class within a top-level class.

Here we go with an example.

class MyStatic {
static class MyStaticInnerClass {
void innerClassObject() {
System.out.println("MyStaticInnerClass called");
}

}
}

class SecondClass {
static class MyStaticSecondInnerClass {
void secoundClassObject() {
System.out.println("MyStaticSecondInnerClass called");
}
}

public static void main(String[] args) {
MyStatic.MyStaticInnerClass objInnerClass = new MyStatic.MyStaticInnerClass();
SecondClass.MyStaticSecondInnerClass objSecondClass = new SecondClass.MyStaticSecondInnerClass();
objInnerClass.innerClassObject();
objSecondClass.secoundClassObject();
}
}


When we execute this code, we'll get below messages.

MyStaticInnerClass called
MyStaticSecondInnerClass called


Tuesday, August 13, 2013

How to call Data Service in ESB WSO2


We have already created a WSO2 DSS service with the name of "EmployeeDataService". Now we have to call this service from WSO2 ESB.

WSO2 ESB is used to create proxy services.

Let’s create a proxy web service which calls a dataservice created in WSO2 DSS.

We have to modify synapse.xml to call dataservice in our proxy.

Synapse.xml is located at below location.

D:\..\wso2esb-4.0.3\repository\deployment\server\synapse-configs\default\synapse.xml

And the default synapse.xml has only “definitions” tag, we need to add some more configuration to call web service.

Before that lets see the structure of the Synapse.xml


Structure of Synapse.xml


WSO2 ESB Config structure:
=========================
synapse-configs
└── default
    ├── api
    ├── endpoints
    ├── event-sources
    ├── local-entries
    ├── priority-executors
    ├── proxy-services
    ├── registry.xml
    ├── sequences
    │   ├── fault.xml
    │   └── main.xml
    ├── synapse.xml
    └── tasks


Modified Synapse.xml as mentioned below.


<!-- An empty flat synapse configuration shipped with the WSO2 ESB -->
<definitions xmlns="http://ws.apache.org/ns/synapse">
             <proxy name="DSS_EmployeeProxy" transports="http" startOnLoad="true" trace="disable" statistics="enable">
        <target inSequence="DSS_EmployeeProxy_IN" outSequence="DSS_EmployeeProxy_OUT" faultSequence="CommonFaultHandler"/>
        <publishWSDL key="DSS_EmployeeProxy_wsdl"/>
    </proxy>
            <sequence name="DSS_EmployeeProxy_IN">
        <log level="full"/>
        <send>
            <endpoint key="DSS_EmployeeProxy_EPR"/>
        </send>
    </sequence>
             <sequence name="DSS_EmployeeProxy_OUT">
        <log level="full"/>
        <send/>
    </sequence>
            <localEntry key="DSS_EmployeeProxy_wsdl" src="file:repository/conf/employee/EmployeeDataService.wsdl"/>
           
            <endpoint name="DSS_EmployeeProxy_EPR">
        <address uri="http://10.167.19.32:9763/services/EmployeeDataService">
            <timeout>
                <duration>20000</duration>
                <responseAction>fault</responseAction>
            </timeout>
            <suspendOnFailure>
                <errorCodes>101500,101501,101506,101507,101508</errorCodes>
                <initialDuration>3000</initialDuration>
                <progressionFactor>2.0</progressionFactor>
            </suspendOnFailure>
            <markForSuspension>
                <errorCodes>101504,101505</errorCodes>
                <retriesBeforeSuspension>3</retriesBeforeSuspension>
                <retryDelay>1</retryDelay>
            </markForSuspension>
        </address>
    </endpoint>
            <sequence name="CommonFaultHandler">
        <log level="custom">
            <property name="MESSAGE" value="Executing default &quot;fault&quot; sequence"/>
            <property name="ERROR_CODE" expression="get-property('ERROR_CODE')"/>
            <property name="ERROR_MESSAGE" expression="get-property('ERROR_MESSAGE')"/>
        </log>
        <header name="To" action="remove"/>
        <drop/>
    </sequence>
    <!-- You can add any flat sequences, endpoints, etc.. to this synapse.xml file if you do
    *not* want to keep the artifacts in several files -->
</definitions>


In above synapse file, we have added IN, OUT and Fault sequence and one end point (Mediators ). Let us look below that what is the use of these mediators

IN Sequence: This is the main sequence from which request starts, whenever a request comes In sequence is executed. We can also put some logic in this sequence but for this normal pass through proxy we have not added any logic.

OUT Sequence: After executing the In sequence or other sequence, at last OUT sequence is executed, in this sequence also logic can be implemented as required.

FAULT Sequence: This sequence is used to handle exception. If any exception comes this sequence is executed. We can supply any value or response as required.

End Point: A endpoint URL is provided in this mediator where request needs to be sent. In this example we have created a proxy of the dataserver so need to provide endpoint of DSS service.

Local Entry: Local entry mediator is used to put/attach any kind of wsdl, xquery, Javascript etc. For this example we have to pass dataservice wsdl as request structure needs to be remain same.

After modify the Synapse.xml, we can see a new service is added in the list of service in WSO2 ESB.


Call a data service from ESB WSO2
We have created an ‘EmployeeDataSource’ service in WSO2 DSS, Let’s call it in ESB.
 As above we have already modify syapse.xml, just refresh the page, ‘DSS_EmployeeProxy’ service should be shown.

Click on try this service.


Click send button.


Data has been fetched through DSS Web Service.
This is the way, we use esb.
Now we need to analyses the synapse.xml and its main tag, elements and attributes.
We use some mediators in the esb to call the services.
We will analyze "Synapse.xml" in next blog..


Monday, August 12, 2013

Call Stored Procedure from WSO2 DSS


We have already created a Data Service for the mysql database. Now we will use Stored Procedure in Oracle and call them in our data service.
Let’s first create database and Stored Procedure.


Create a database, in this example I have used database name is “shri”.
Enter Username/Password – shri/shri
Create a table with the name of “EMPLOYEE”


If you want to insert some values in this table, then use insert command.


Now in this service we have to use Stored Procedure, so let’s create a stored procedure with the name of “EMP_INFO_INSERT”.


Click “OK” button.
And write the stored procedure for insert values in employee table as given below.

create or replace
PROCEDURE EMP_INFO_INSERT(
               p_emp_id IN EMPLOYEE.EMP_ID%TYPE,
               p_emp_name IN EMPLOYEE.EMP_NAME%TYPE,
               p_emp_add IN EMPLOYEE.EMP_ADD%TYPE,
               p_department_id IN EMPLOYEE.DEPARTMENT_ID%TYPE,
     p_designation_id IN EMPLOYEE.DESIGNATION_ID%type)
IS

BEGIN

  INSERT INTO employee (EMP_ID, "EMP_NAME", "EMP_ADD", DEPARTMENT_ID, DESIGNATION_ID )
  VALUES (p_emp_id, p_emp_name,p_emp_add, p_department_id, p_designation_id);

  COMMIT;
 END EMP_INFO_INSERT;


Compile it.
We are done with the database end, now need to create a service to call this stored procedure at DSS end.

DSS:-
Start the server from below location (double click on wso2server.bat file)
D:\...\wso2dataservices-2.5.1\bin\wso2server.bat
Server will be running on below address.
https://10.167.19.32:9443/carbon/admin/login.jsp


Enter Username/Password – admin/admin


You can see all the WebServices on clicking the of List link under the service tab.


Let’s create a new DSS service, click on create link under dataservice.
Enter “StoredProcedureExample” in dataservice textbox, click next.


Click Next.

In next page we need to add a Data Source.
Fill all required details as given below.
dataSource Id – OracleSPExample
DataSource Type – RDBMS
Database Engine - Generic
Driver Class - oracle.jdbc.driver.OracleDriver
JDBC URL - jdbc:oracle:thin:shri/shri@localhost:1521/xe
User Name – shri
Password - shri


Click on “Test Connection” Button, if connection is ok, will give successfully connected popup message otherwise give an error.


Click on “Save” button.
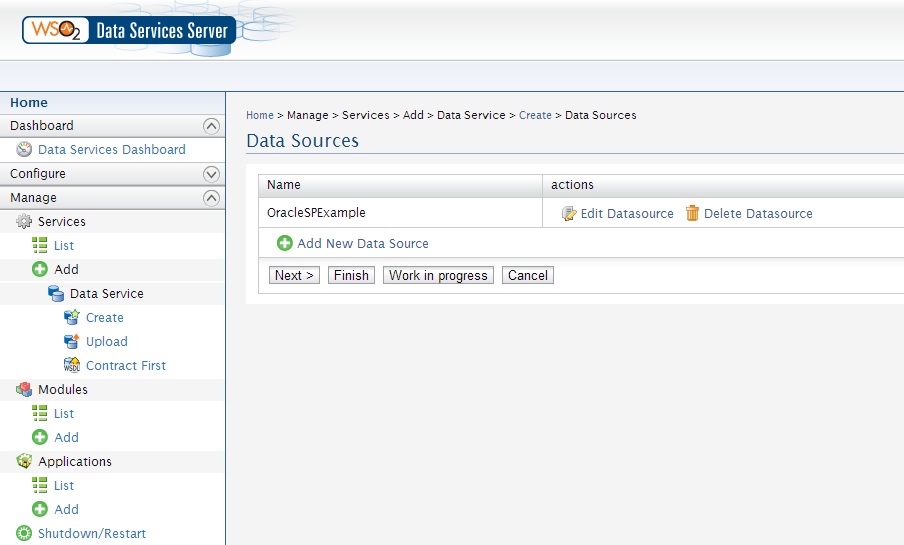
OracleSPExample data source is created. You can also edit or delete this data source.


If we need to create or add more data Source, repeat the above process again otherwise click “Next” button.
In next Page we have to add query which will fetch records from the database.

In this Page fill all required fields.
Query Id – selectEmployees
Data Source – OracleSPExample (It comes after creating data source in previous page)
SQl - select * from employee
Now we need give input or output mapping.
When we have to take output according to given input that we need to give here. In this example we are not giving any input criteria, just getting the output of the select query.


We have to define only output mapping here

In the “Result (Output Mapping)” block define below property.

Grouped by element – employees
Row name – employee
Row namespace - http://test.org


Click ‘Add Output Mapping‘.
Map all elements as defined in database table.
First element is added (EMP_ID).


EMP_NAME is added


Add EMP_ADD in output mapping


DEPARTMENT_ID is added


Last element in table is DESIGNATION_ID click add button to add this element.


Click ‘Main Configuration’ button, click yes when popup is open.


Result (Output Mapping) will look like this.


Click Save button.


selectEmployees query has been added. Let’s add one more query to call stored procedure.

In this Page fill all required fields.
Query Id – employees
Data Source – OracleSPExample (It comes after creating data source in previous page)
SQl - call EMP_INFO_INSERT(?,?,?,?,?)
Now we need give input or output mapping.
When we have to take output according to given input that we need to give here. In this example we are passing input elements to add data in the table


Click Add New Input Mapping button


In above image map EMP_ID, it is numeric type in database so sql type ‘Numeric’ has been selected
Click add button

Map EMP_NAME


Click add button

Next is EMP_ADD


Click add button

DEPARTMENT_ID has been mapped


Click add button
Last is designation_id 


Click Add button

Click main configuration button, click yes when popup is opened.


Input mapping will look like this (as below image)


On Clicking Save button below page should be shown.


Click Next button.


Click ‘Add New Operation’


Give addEmployee in Operation Name
Select Query Id – employees
Click Save button
Next page should be shown as below.


here we need to add one more operation
One for the adding record in the database (addEmployee)
Second is ‘selectEmployee’ which will fetch record from database.


Give Operation Name is selectEmployee
queryId – selectEmployees
click save button

Next page would look like this.


Click finish.
New service must be show in service list with the name of ‘StoredProcedureExample’.


Click ‘try this service’.


Click selectEmployee.


Whole record has been fetched from the database.


Now click addEmployee Operation.


Enter fields


Enter values and click ‘addEmployee’ button. Inserted record will be saved in the database, to show this value you can perform selectEmployee button again.